How to Create, Edit and Manage Folders in PhotoServe
Best practices, tips and instructions on how to use Folders for uploading and showcasing images.
Contents
- Best Practices for Organizing Folders
Best Practices for Organizing Folders
This is a must read! It will save you time, set your website up for success, and help customers find their images to purchase.
Folder Structure Planning
Before you create folders to upload images to sell on PhotoServe, plan how you want to organize your folders.
A famous quote attributed to Dwight Eisenhower is “plans are useless, but planning is indispensable”. Just a little upfront thought put into how you organize your folder structure will save you a lot of time in the long run.
- Name folders based on what the customers would find useful. For example they would expect to look for their event category name not the photographer’s name that took the photo.
- Folder titles create the URL address associated with the folder. It’s good practice to keep stable URLs to avoid broken links so while the folder title can be updated the URL will not change. This is to avoid customers getting page errors and you losing sales due to links not working properly.
- A folder can only have folders OR images inside it. It cannot have both folders AND images - this is to make it easier for customers when browsing the site.
- The amount of images in a folder should be manageable for a customer to review, 500 is a lot and the max amount we recommend, fewer is even better.
Naming Folders
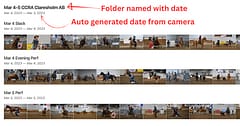
Naming Folders by Event may be the simplest way to organize. Dates are automatically assigned to folders (example below) but including the year in the name can be beneficial if you shoot the same event each year and want to clarify the date. Below are example folder names to help you with your planning.
Naming Folders by Event Example
- Create Folder: Event Name (example Mississippi State 4-H Horse Show)
- Create Sub Folders: Make the images more searchable by breaking up the event into different dates, divisions, categories, etc. (example Around the Grounds candids, Awards, Halter Classes & Showmanship, Hunter Division, etc).
- Create a Child Folder within a Child Folder: If you want any folder further broken down you can continue to add folders within a folder. (example Roping has Child Folders for Backdrop, Breakaway Roping, Calf Roping, Daily Team Roping and Goat Tying).
Naming Folders By Date
If you have lots of events a year and keep images for clients to purchase for 6 months, naming Folders by Month might be an easy way for customers to find images. Do not create Folders you have no images for, Folders will only appear to customers if they contain images.
Naming Folders By Date Example
- Create Folder: Date (example January 2023)
- Create a Child Folder for Event: Event Name (example: Downhill Skiing Lake Louise)
- Create a Child Folder for Each Category within that Event: Division Name (example: Women’s Downhill, Men’s Downhill, Awards)
Dates are automatically applied to photos based off of camera settings, and a folder date range reflects all the images within it. Adding dates in Folder names is only to allow customers to easily find their images.
Folder Names Creates the URL Link
The Folder Name creates the URL Name for that Folder.
A Folder named Downhill Skiing will appear as example.photoserve.co/downhillskiing. Add a sub folder named Men’s Division, the URL for Men’s Division will appear as example.photoserve.co/downhillskiing/mensdivision.
Type the Folder title how you want it to appear. Keep them simple and clear. Remember Folder names create the URL and URLs have limitations in what characters they can contain and special characters are stripped when converting into a URL.
Example of Good Folder Name 2023 > Tennessee Child and Youth Show
Example of Bad Folder Name 2023 > Tenn. Child+Youth_Show_2023_Sat_12th-of-June
Changing a Folder Name
Once a Folder is created the name can be changed. You may require a minor change, such as noticing a typo and fixing it. If you named your Folder for one event, such as Swimming, then decide you want to upload your Track and Field images you need to create a new Folder for Track and Field. Remember the Folder Name creates the URL, the Folder name will be updated but the URL will stay the original Folder Name.
You do not want a URL to be adjusted after images are available to customers since that link may have been shared and if you adjust the URL name the previous link will be broken and you may lose out on sales.
Set Pricing for Folders
When you select a price tier for a Folder all Child Folders inherit the price tier by default. If you want different price tiers for Child Folders you can set each Folder accordingly as you create or edit it.
Tip for setting pricing: Keep pricing simple!
Customers need to easily find their images, easily understand the cost of those images, and easily purchase and download them. It’s best to have as few prices as possible across your website. You might need prices in different currencies if you work internationally, or types of images like formal vs candid, or type of event. Within one event have 1 - 2 prices max, do you really need more? Ask yourself why you need more. Now ask yourself how easy it is to explain the different prices and if you were the customer would you understand why there is a price difference? Do not put people off by different price structures, try to have a price (or a few) that make sense and won’t put the majority of potential customers off.
Instructions for Creating, Editing and Deleting Folders
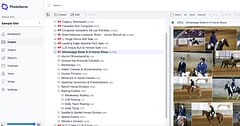
To add or edit folders log into your PhotoServe site at https://photoserve.co/console. The Main Navigation takes you to Images; where Folders are maintained. The panel on the left allows you to create, update and delete folders from your site. The panel on the right allows you to view images in folders, star favorite images to be shown in Folder preview on your customer facing site.
Creating a Folder
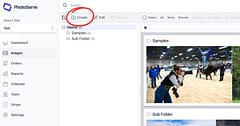
- In the Main Navigation click > Images
- In the Left Panel > Create
- Fill prompts for Folder Name, Country, Pricing
- Click > Create
Set Pricing for Folders
When you select a price tier for a Parent Folder all Child Folders inherit the price tier by default. If you want different price tiers for Folders you can set each Folder accordingly as you create or edit it.
Creating a Child Folder
- Click on the Folder you want to create another Folder within
- In the Left Panel > Create
- Fill prompts for Folder Name, Country, Pricing
- Click > Create
Adding Images to a Folder
- In the Main Navigation click > Images
- In the Left Panel > Click on the Folder you want to add images too
- In the Right Panel > Select Files from Computer or Drag and Drop JPEG images
- Wait for ALL images to process/upload before moving or deleting images
Creating Child Folders After Images have been added to Folder
Do not delete the images then create the Folders and re-upload! By creating a Child Folder all images will automatically move within the new folder and you can create multiple Folders and move images wherever you want.
- Click on the Folder you want to create another Folder within
- In the Left Panel > Create
- Fill prompts for Folder Name, Country, Pricing > Create
- Images will automatically appear in the Child Folder
- To create another Child Folder follow same steps
Remember a Folder can only contain Images or other Folders, not both.
Move Images to a Different Folder
- Click the Folder containing the images you want to move
- Click > Select on the Image Management panel
- Select All or Individually Click the images you want to move
- Click > Move and select the Folder you want to move them too
Update Existing Folder Details (Name, Country and Pricing Tier)
- Click Folder to rename
- Click > Edit
- Change the field of Folder Name, Country and/or Pricing as required
- Click > Create
Delete Folder
- Only delete a Folder if you have not publicly posted images or are no longer selling the images. Otherwise, rename the Folder or move the Images.
- Click Folder to Delete
- Click > Delete